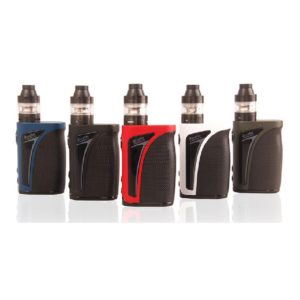
Vaporesso Swag PX80 Showcase
Welcome back to our blog page! Yes, it has been a minute but with the curren...
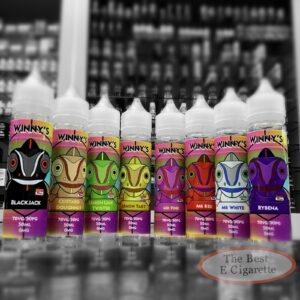
Read MoreLooking for a new range of liquids to treat your tastebuds with? Check out Winny’s 50ml Range! We currently have 22 different flavours ranging from fruits and mints to desserts and sweets! Below we will go through the full range and describe the types of flavours you’ll get in this range!
For this post, in order to give a personal opinion, I gave each of the flavours a try on my Pulse X RDA from Vandy Vape. You can get yours here if you wanted to get into coil building.

Blackjack: The classic flavour that everyone seems to be trying to get a hold of! When I tried this liquid, it reminded me of the Barratts Blackjack sweets from the 10p pick & mix you used to get when you were younger. a strong candy flavour!
Banana Custard: Sweet lashings of creamy custard with big chunks of banana. This packs a lot of flavour and the balance between the banana and the custard is just right. Banana can often be an over-powering flavour so finding this balance isn’t always easy.
Blueberry Muffin: I always like to see a Muffin flavour because they’re not as common as you would expect for saying actual baked muffins are so delicious. I’m over the moon that we’ve got one now! A rich, muffin base flavour with strong blueberry flavour. Blueberry always goes so well in E-Liquid too!
Blue Raspberry Chewitz: Cast your mind back to when the small square chewy sweets were everyone’s go-to confectionary; the ones with the little dino as the mascot! Well we’ve brought them back with a blue raspberry twist and the result is delightful! You get plenty of the tangy blue raspberry but it’s got a lovely sweet candy undertone to take the edge off.
Bubblegum Millionz: This flavour is rather sought after in the vaping community so the pressure was on – there was a lot to live up to! I can honestly say though, considering you usually see this flavour in “premium” brands at around £14.99 per 50ml, this one leaves me questioning why anyone would ever pay that! It’s absolutely spot on and for a fraction of the price – £4.99 is a steal!
Cherry & Watermelon Nerdz: This is a winner for the sweet tooth vapers out there. Juicy cherries come together with refreshing watermelon and a sweet candy undertone. This flavour feels as if you’ve just bitten into one of those jelly sweets with the gooey centre that bursts in your mouth!
Custard Doughnut: Nothing beats the smell of a freshly baked doughnut, especially when it’s filled with a generous helping of custard. This one is exactly what it says on the tin, definitely one for the dessert lovers out there. You get plenty of the moreish sugary dough at the start of the draw, then the lovely smooth custard pulls through which I think actually rounds the flavour off well and stops it from becoming too sweet.
Fantango Ice Blast: Arguably one of the best drinks ever made now in a 60ml bottle! This one is a real sweet mix of berries finished off with an icy slush blast. The coolness balances the flavour off perfectly and as above stops the flavour being too sweet.
Fruit Salad: If the blackjack wasn’t your style of classic sweets, maybe the fruit salad is! A real fruity number reminiscent of the Barratts chews.
Grape Berry Mint: If you like a fresh kick with your fruits, this flavour could be worth a try! There’s plenty of depth to this one; black grapes and sweet berries provide a lovely fruity base, then they’re finished off with a cool minty after taste. This one is moreish, I couldn’t get enough of this one, you need it in your tank ASAP!
Lemon & Lime Twister: Everyone’s favourite ice cream now in your e-liquid but with a lemon & lime twist! Here you get all the tartness of the lemons & limes, but they’re softened brilliantly by the sweet pineapple and creamy vanilla. This flavour is beautifully moreish!
Lemon Tart: There’s no doubt that Lemon tart is one of the sought after tarts out there, so this one needed to be bang on the money. Winny definitely knows his pastries as this one is honestly devine. There’s lashings of lemon curd at the start of the draw, but then the crumbly buttery tart pulls through and rounds the flavour off so well. These just keep getting better!
Mango Mint: Mango flavours have really started to take off again in my opinion; I don’t usually get a lot of people asking for this particular flavour but since lockdown and the distinct lack of travelling abroad, I guess the exotic flavours are a good replacement for them. Mango isn’t always an easy flavour to get right, but this has quite a lot of depth to it. It definitely reminded me of a very popular flavour called “Fat Boy” which was mango, lemon, lime and a touch of mint. This has the full-bodied mango with a hidden hint of citrus, but then the mint is quite prominent which is great if you love mint like me.
Mr Pink: The popular “Pinkman” flavour reborn. Many have tried to replicate this, which is hard when the main fruit notes have never been revealed. Winny’s take, Mr Pink, is an intricate mix with high notes of strawberry, aniseed, blackcurrant and grapefruit. It’s such a great mix of sweet and sour; nothing stands out too much or overpowers the rest, so you just get this burst of fruit bouncing around on your tastebuds.
Mr Red: Winny clearly likes his popular flavour replicas as he’s produced another one here. This one’s based on a certain well known “astaire” flavour that can definitely clear the sinuses. Sweet cherry and a whole host of delicious red berries are layered with aniseed and eucalyptus before being frozen with an icy menthol blast. This one really hits hard. Beautiful if you love mints and menthols, but definitely one to stay clear of if you don’t!
Mr White: If everyone’s favourite chemistry teacher made E-Liquid, this would be the one. With Winny on a roll with classic e-liquid flavours, this was one he just couldn’t leave out! Earthy blackcurrants and a hint of mixed fruit are thrown together with aniseed and a strong hit of menthol. Another one for the menthol lovers!
Parma Violetz: I don’t think there are many better flavours, but I’m pretty biased when it comes to parma violets since they are my favourite sweets! This tastes exactly like them. I love it. Not much more to add! I still can’t quite believe this range is just £4.99 per bottle!
Rybena: A great flavour and it’s been popular since its release as well. Just as you’d expect, a sweet blackcurrant squash. I’ll be honest though, if you like your cordial very watered down, this one might not be for you. It’s a strong one!
Sour Apples: Sour is a very tough sensation to crack in e-liquid, and it’s something that I absolutely love so I’m always thrilled when someone manages it. This one didn’t quite achieve proper sourness; it was ever so close, but I almost feel it’s for the better. The apples are wonderfully tart which almost emulates sourness in itself. Any more and I feel the flavour would be too much.
Strawberry & Lime Cider: I think with this flavour, maybe we should have released it back in March when the pubs shut for lockdown, but better late than never I say. Sweet strawberries and fresh lime pressed in with an apple cider. This is a really refreshing taste. I’m not much of a cider drinker, so this one surprised me at how much I liked it.
Strawberry Milkshake: Now I do like my dessert flavours and I’ve got to say that this strawberry milkshake really hits the spot. Although simple, it’s so rich and creamy. Definitely one that’s hard to put down.
Vymto: I would say this is more of a candied vimto, with more of a sweetness to it than the squash. It definitely works and is a lovely flavour, but it’s just worth noting.
To conclude with this range, its got a flavour that covers pretty much all the areas you’d want, I think it’s a well-round range with a huge selection and a remarkable price. At just £4.99 per bottle, to be honest, it’s a bargain in my opinion and you definitely get more than what you pay for when it comes down to the quality of the flavours.
Thanks again for reading and if you want to order any of these flavours then you’re in luck as they are available on our website, check the like here to find out more!
The review was written by Cal
Good morning and welcome back to The Best E-Cigarette Blog! As you are probably aware, this month is Swaptober month which is where we encourage those who are smoking to make the switch to vaping and quit the habit for good. One issue is that vaping has become this complex world where picking your first kit can be hard. Of course here at The Best E-Cigarette, we want to pick the right kit for the right person, and recently I have discovered you can’t go far wrong with the Joyetech eGo Pod Kit. We were sent a sample for me to try, and I loved it so much we ended up stocking the device! For this reason, I figured I would do a full review about this kit.
Please note, this review is not endorsed by anyone, it’s a full, unbiased review on the eGo Pod kit and all opinions on this kit are my own.
In the box you’ll get:
1x Joyetech eGo Pod Battery
1x Joyetech Ego Pod (installed) For extra pods, click here.
1x Charge Lead
1x Instructions Booklet
Dimensions: 98 x 19mm
Material: Stainless Steel + Plastic
Battery: Built-in 1000mAh
Chipset: Avatar IC 1.0
Cartridge Capacity: 2.0ml
Resistance: 1.2ohm
Protection: low/high resistance, overheating, short circuit, overcharge / over-discharge
Connector type: magnetic
The kit itself is sleek and lightweight and also very simplistic in its design which I think is great for a new vaper. The device comes in four different colours; Black, Silver, Blue and Rainbow (Irredesence if you want to be fancy). There are no buttons on this device which means it’s draw activated, another plus for a new vaper as it’s as close to a cigarette as possible.
The pod section itself is also built well with a sturdy construction made from plastic which houses the built-in coil. It is a bottom fill but has a child-proof valve which we will look into more in the next section.

These are the four colours available: Rainbow/Black/Silver/Blue
The operation of this kit is pretty simple which again suits new vapers down to the ground. To fill the pod, simply pick your favourite juice (I’ve gone with the Exotic Delight from British Blend) and push it into the silver fill port/valve that’s at the base of the pod itself. This should push the valve inwards to allow liquid in. From there just squeeze the bottle until the pod is full. As with any coil, make sure you give the pod a good few minutes to prime (soak) the coil inside to avoid instantly burning the coil out!

An image of the filling mechanism
For using the device, place your pod into the battery; you’ll be able to turn the pod so it clicks into place. This is because the little ridge on the pod fits nicely into the opening of the battery. It’s also magnetized making it more secure and on top of all that, the LED light on the battery will flash white when the pod is installed correctly.
To actually use the device, just inhale on the kit just like you would on a normal cigarette and it’ll power straight up. I’ve been very impressed with how quickly it does this!

The LED light will flash white when a pod is installed, will also glow white when in use.
The battery on this device, I’ve got to say is a bit mindblowing! I know that sounds a bit extreme but I’ll explain. The battery capacity of the kit is only 1000mAh which we know isn’t huge, however after using this device for the best part of a month, I’ve only really had to charge it once every two days.
I think this is down to the resistance of the pods since they are only 1.2ohm and don’t draw out tonnes of power from the device. This makes this a major pro in my opinion and that’s not to mention that the pods tend to last around 3 weeks in my experience.
The flavour is absolutely spot on too; the Exotic Delight liquid I was using tasted better in this that I’d ever experienced with any other starter kit I’ve tried! This kit also produces a decent level of vapour so you definitely know you’ve had a good drag!

The pod and battery seperate.
I have compiled a list of pros and cons for the Joyetech eGo Pod kit below for you to check out!
Overall I think this truly is the best starter kit for anyone looking to quit smoking and start vaping. As I said with my concerns for this kit are quite minor as the kit works the way it is supposed to work, to replicate the feeling of smoking which it does extremely well with the breath activated draw.

The Joyetech eGo Pod Kit in blue.
For the price of this kit, we’ve got them on sale for £19.99 which is fantastic value for the kit. If you are interested, check out the eGo Pod now!
Once again thanks for checking out the review and I hope you found this post to be helpful.
The review was written by Cal
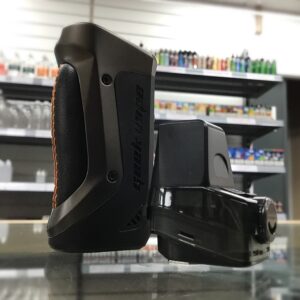
Hello and welcome back to another review. Here we have the absolute tank that is the Geekvape Aegis Max! I was very excited to get my hands on one of these, so without further ado, let’s get straight into it!

Mod Size: 93 x 46.3 x 34mm
Battery: Single 20700/21700 (or 18650 with adapter)
Temperature range: 100-315°C / 200-600°F
Resistance range: 0.05-3ohm
Dust resistant, water-resistant and shock-resistant
Micro USB – 1.5A / 5V charge rate
For the purpose of this review, I used the trusty Blotto RTA from Dovpo in collab with Youtube vape reviewer, The Vaping Bogan. Installed in said RTA I have some Coilology Twisted NI80 dual coils (with a resistance of 0.2ohm) with Cotton Bacon. For Juice, I went with the 70VG/30PG Banana Custard from our new Winny’s Range!

The Mod itself is a cracking piece of kit; with its design and look, it’s a little nod to the Aegis Solo but stands a little taller, and instead of taking a single 18650 battery, it’ll take a 21700 or 20700 battery. 18650 if you use the adapter which comes with the kit. To install the battery into your mod, all you have to do is unscrew the battery door on the bottom of the mod, this is a lot better than the catch doors we’ve seen on the Aegis Legend or the Ageis X, I’ve never really trusted catch doors to be fair and the threads on the Max are smooth and easy to screw/unscrew. As with standard for the Aegis series, the Aegis Max is also made from silicone and alloy materials which makes this mod IP67 certified, staying true to the series of the Aegis.

The Aegis Max comes with an array of features which suit all vapers, below is all the features and how to set them up as well as how to use the device.
Turn on/off – Press the fire button five times
Adjust Wattage/Temp – Use the + and – buttons
Lock Wattage/Temp/Settings – Press and hold the + and – Button
Menu – Three Clicks of the fire button
Here I will talk about the different settings the mod has
Power – This is your standard setting which most people are familiar with, you can adjust your wattage according to the wattage range of the coil with a max output of 100w
Temp – Temp Control (TC) is the setting which allows you to run your tank depending on your coil material. you can choose from; Nichrome (NI) Stainless Steel (SS) and Titanium (TI). There is also a TCR mode which stands for Temperature Coefficient of Resistance, What this means is that the mod will take into account the resistance and material of the coil. if you are like me and this still goes over your head, less resistance, more heat at a faster rate, ill be honest, when I looked this up, I think I read it about four times to understand how this works!
VPC – VPC which stands for Variable Power Control. This is a sort of curve setting which allows you to set how the coil behaves when in use. An example of this is if you vape at 50w, you can set the points to start from 30w and work your way up or start from 70w and work your way down as a sort of pre-heat mode.
Bypass – Bypass mode is where the device will work depending on two factors; The resistance of the coils and the voltage of the battery, in short, the lower resistance and more charge on your battery you have, the more vapour production your tank will do. it works similar to a mechanical mod but the bonus of this is that you’ve got the safety features of a regulated mod!

As with every mod and device, there’s pros and cons to each. I’m happy to report that the pros definitely outweigh the cons, ill list them below
In conclusion, I am extremely impressed with this mod, it has everything you expect from a series like this. Geekvape has always outdone themselves with there hardware, you only need to look at devices like the Blade Mod which is a dual 21700 mod or the Ammit RTA as well. If you are looking for a single battery mod, I would highly recommend this to anyone! Click here to get yours now.
Thanks for reading.
Written by Cal
Welcome back to another review from The Best E-Cigarette! In today’s review, we will be looking at the newly released Voopoo Drag Mini Refresh Kit which features the exciting PnP tank!

Drag Mini Refresh Kit
1x Drag Mini Mod
1x PnP Pod Tank (2ml Capacity)
1x 0.15 ohm PnP-VM6 Coil (60w-80w)
1x 0.2 ohm PnP-VM5 Coil (40w-60w)
1x Micro USB Cable
1x User Manual
Dimensions: 127.6mm x 25.5mm x 48.5mm (with tank)
Device Materials: Zinc Alloy, Resin (Black Edition)
E-Liquid Capacity: 2ml
Tank Materials: Stainless Steel, PCTG
Output Power: 5W – 117W
Output Voltage: 0V – 7.5V
Supported Resistance: 0.05 ohm – 5.0 ohm (we do not recommend using an atomiser below 0.1ohm)
Battery Capacity: 4400mAh
Compatible Coils: VOOPOO PnP Coils
The Drag Mini Mod in this kit is the same fantastic Drag Mini that came with the previous Drag Mini / UForce Tank kit. The mod was so good that nothing needed changing with the Refresh edition! This compact mod holds an internal 4400mAh battery for all day vaping and is charged by a Micro USB Cable supplied in this kit.

Voopoo Drag Mini Mod
The max output on this device is 117w and it comes equipped with the Gene Fit Chip for rapid press-to-fire time, precise accuracy of settings and the option to optimise battery life, flavour or cloud production.
Some of you may recognise the PnP Pod; it has been seen on other successful Voopoo devices such as the Drag X and Drag S Pod kits. It was so popular that Voopoo decided to turn it into a tank! They created a base with 510 threading where the PnP Pod magnetically clicks into (just like it does into the Drag X & S kits) so the PnP Pod can be used as a tank on any 510 threaded mod. This can be sold on its own or as part of a kit, in this case with the Drag Mini Refresh Kit. The coils for this tank are the PnP coils that were used on the above Drag Pod Kits and the much loved Vinci series, so we already know they’re going to be good as everybody raves about them!

Voopoo PnP Pod Tank
The PnP Tank has AFC (Air Flow Control) on its base so you can alter how tight/loose the draw is, along with a push-fit coil system for easy installation. To change the coils, simply remove the pod section from the base, pull the old coil out of the pod, then push in a new one. Make sure your pod is empty before removing the coil as the contents will spill out as you remove the coil.
To fill this tank, again remove the pod from the base of the tank and unplug the bung located at the bottom of the pod, from there you can fill up with your favourite flavours (I went with the 70VG/30PG Bubblegum Millionz from Winny’s for this review). Once the tank is full, plug your pod back up and place back into the base.
In the box, you’ll get two of the PnP coils, both of which are mesh coils for improved lifespan and flavour than more traditional coils.
VM6: This is a 0.15ohm coil which runs at 60w-80w. This is quite powerful for a coil that looks quite small compared to a lot of high power coils, but it definitely holds its own and packs a big punch (I’ll get onto more detailed performance later in the review).
VM5: The 0.2ohm coil that comes with the kit runs between 40w to 60w. For saying my usual daily kit is a mech mod with coils around 0.11omh (meaning lots of power), I did enjoy the hit of this coil a lot, in fact maybe better than the 0.2ohm coil.
The PnP coil range does have wide variety of coils to choose from, including a 1.0ohm coil for those who were looking for a mouth-to-lung Kit with an absolute powerhouse of a battery.
To turn the device on/off, press the fire button five times in quick succession
Change modes on the device: Press the fire button three times in quick succession
Lock Device: Press and hold the fire button and + button
Flip Screen: Press and hold the fire button and – button
Regular Wattage mode: This is the standard mode where you can adjust your wattage to whatever you like
Smart Wattage mode: This is quite a clever setting, when you install a new coil, it will adjust your wattage to the correct setting i.e. a coil between 40w-60w would probably adjust to 50w.
Temp Control mode: This mode supports Stainless Steel (SS) Nichrome (Ni) and Titanium (TI) Types of coils.
FIT Mode: With FIT Mode, it will find a setting that is best for battery life (FIT 1), flavour (FIT 2), or cloud production (FIT 3).
Custom Mode: This mode allows the user to set a curve which will pre-heat the coil when you fire it. To adjust this, hold the + and – buttons at the same time, use the fire button to select which parameter you would like to adjust and then use the + & – buttons to change them accordingly.
Performance
To begin with, the menus on the Drag Mini mod are really easy to navigate through which is a huge plus as some mods can get too technical with settings in my opinion. I decided to use the 0.15ohm coil first as I was eager to see if it could actually work comfortably on its recommended wattage for such a small coil. The coils are really easy to fit as they push/pull out smoothly whilst still being secure when they’re in. The ease of filling surprised me too; I expected it to be fiddly with it being bottom fill with a rubber seal/bung, but you can just take the pod section out, stand your mod (with the 510 base still attached) on the side, then easily fill up with no hassle. The pod clicks in rather satisfyingly too thanks to the magnet. This sat well with me as I like to know something has secured in properly. I began with the standard wattage setting and set it straight to 60W with the airflow fully open. My doubts were seemingly misplaced from the first draw! The flavour was very strong and the cloud was very large and dense! After a full day of vaping on this setting (with very heavy use) there was no flavour drop off and the mod still had half its battery life left! On the second day I charged the mod back up to full before having a vape. We usually recommend waiting until the battery is flat or nearly flat to preserve battery life in the long run, but for the sake of the review I charged it at half. I then decided to really test the coil so I ramped it up to 80W and vaped away. I felt the flavour dropped off slightly as the coil was at the max of its recommended settings, but it was still very tasty and cloud production was obviously even bigger if that’s what you’re into. By the end of the day my battery was nearly flat but the coil was still going strong. On the third day I decided to play around with some of the other settings. I tried the FIT modes but in all honesty didn’t notice too much of a difference with any of them. The curve feature seems great and quite detailed, but I’m more than happy on standard wattage, so found myself back on wattage mode at 60W. I got to day 5 with the coil still not showing any signs of burning, but decided to swap to the 0.2ohm coil to see how that performed. With a wattage range of 40W-60W I decided to start right in the middle, and from the first draw I noticed a significant improvement to the (already very impressive) 0.15ohm coil. The flavour was even better. It seems I got lucky and found the sweet spot straight away (at least for my personal preference), as I tried multiple wattages above and below this afterwards and found myself back on 50W in the end. The cloud is still great too so after the first day I’d already made my mind up that this coil was my favourite (whilst hoping it didn’t prove me wrong by suddenly burning out). On the second day I had a play around with the other settings again, but found that standard wattage mode more that satisfied my needs. I’m on day 6 with this coil whilst writing this review and it’s still doing well! Flavour has dropped ever so slightly, but that could also be a bit of vaper’s tongue. No signs of burning yet so fingers crossed it lasts a while!
*UPDATE* I got to day 10 when the coil started showing signs of burning out, then it eventually went by the end of day 11. I consider this a decent coil lifespan as 50W is relatively high and I do literally have my kit in my hand all day!
Pros
Solid mod, nicely built
Works with the pods from the Drag X/Drag S
Big Battery Capacity
Great flavour and vapour on both coils
Surprisingly easy to fill
Easy coil change
Easy menu navigation
Handy smart wattage mode
Compatible with other coils for different vaping experiences
Cons
Not compatible with the Vinci Pods
Not able to change drip tip

Overall I’ve thoroughly enjoyed the Drag Mini Refresh. It’s been a great series of mods ever since the original Drag came out, and the Drag Mini only continues that fantastic reputation. They are reliable and well built with a great chipset. Click here to get yours now!
Thanks for reading and I hope you all enjoyed the review of the Drag Mini Refresh kit! As always you can check out our Facebook & Instagram pages for daily updates.
This review was written by Cal
Back again with another review on the highly anticipated Geekvape Aegis Boost Kit.
Geekvape, the people behind the popular Aegis series of mods, are known for their sleek designs and exceptional comfort coupled with their use of IP67 Grade materials to make their mods shock resistant, water resistant and dust resistant. Now they have released a pod kit with these same unique features! Meet the Aegis Boost Pod Kit.
1 x Aegis Boost Mod
1 x Aegis Boost Pod (including removable mouthpiece cover)
1 x Spare Drip-Tip
1 x Coil Removal Tool
1 x Micro-USB Charging Cable
1 x 0.4Ω Mesh Coil (25-33w)
1 x 0.6Ω Mesh Coil (15-25w)
Looking at the Aegis Boost kit, we are greeted with the usual smooth silicone, leather & zinc alloy feel that makes up those sweet IP67 materials. The beauty of the Aegis series’ is that although they’re strong enough to take a bit of a beating, they’re still comfortable in the hand and no aesthetics or ergonomics are sacrificed for the IP67 certification. The Aegis Boost is no different; it looks great and fits perfectly in the hand, so let’s just hope it performs as well as it looks and feels! Just like the previous Aegis’, you have a nice bright LCD screen to display wattage, battery life coil resistance etc, but because this is a pod kit, it has no fancy menu system which I think is great because it encapsulates everything a pod kit should be (small, compact and simple) – another tick in the box for me!
Aegis Boost – The device and pod
The Pod has adjustable airflow control, allowing the user to alter how tight or loose the draw is. For this kit, with the airflow fully open it allows for a slightly restricted direct-lung (DL) vape, or with it partially closed it allows for a satisfyingly restricted mouth-to-lung (MTL) vape when on a lower power with a suitable coil. The airflow dial is in the form of a wheel on the side of the pod, so just rotate it to open/close the airflow. The Boost Pod also has a top fill mechanism which I haven’t seen a lot on pod systems; usually the fill port is underneath or on the side of the pod. This is a huge bonus for me because pod systems are meant to be an easy, practical option for people, so although it’s usually a design necessity for them to be bottom/side filled, I always think it takes away from the simplicity of what a pod system is meant to represent. To fill up, simply remove the bung from the top of the pod and fill with your favourite E-Liquid. Once it’s full, simply push the bung back into place and you’re all set to go!
Changing the coil is simply achieved through a push/pull method, although the coil sits very snug so can be slightly difficult to pull out. If you have strong nails then it should be a breeze but it’s probably easier to use the coil tool that is included with the kit. Just place your tool at the base of the coil under the ridge and then pull the coil out from the pod. From there you can fit a new coil in by pushing it into the space where the old one was. In order to perform a coil change you will need to take the pod off the kit which can be achieved by pushing the ‘press release’ catch on the back of the pod to pop it out.
As I said previously the Aegis Boost doesn’t have a menu system, but it does display the essentials on screen such as your wattage, battery life, puff counter, resistance etc. I like this because I dislike messing around with settings, I like to power on, fill up and go, so when I realised there were no menus to navigate through, I was pretty happy!
Of course, it does come with regulators as you would expect from any device these days, these will protect you from short circuits and such which is always good to see. There’s also a handy lock system which protects you from accidentally increasing the wattage of your device. I’m pretty glad this feature is in place as it’s easy for your wattage to adjust in your pocket. To lock the device, simply press and hold the positive and negative buttons for a few seconds and then it will display a locked message. Unlocking the device is done the same way.
Aegis Boost screen
Even though the 0.4ohm coil comes pre-installed, I thought I’d save that until last because I knew I’d be using it most with it being the direct-lung coil (I prefer direct-lung to mouth-to-lung). So I pulled it out, popped the 0.6ohm coil in and filled up with some British Blend Rhubarb & Custard 60vg/40pg 3mg. The 0.6ohm coil is rated at 15w-25w so I actually decided to start below the lower end of the spectrum at 12w to bed the coil in. The flavour was surprisingly good considering I was using it below the recommended parameters. I then gradually worked my way up the wattage; I found the mouth-to-lung performance for this coil peaked at 17w where the flavour was at its best (it was fantastic to tell the truth), the throat hit was just right and the vapour production was good but not too much. Any higher wattage than this I felt was too powerful for mouth-to-lung. This was all with my airflow half open and the drip tip that comes attached on the pod (there is a thinner spare which might actually be better for mouth-to-lung). With this coil having the ability to go up to 25w, I also cranked it right up to this, opened the airflow and used the device as a direct-lung kit. This was still very pleasant although it needed a bit more power which is where the 0.4ohm coil comes into it. I must say though I was impressed that before even trying the 0.4ohm coil, the kit was already appearing versatile with comfortable mouth-to-lung and direct-lung capabilities on the 0.6ohm coil. In terms of coil life, I can’t give a complete assessment of the 0.6ohm coil because I switched it out for the 0.4ohm coil after four days, not because it was burnt (it didn’t seem even close), but because I wanted a bit more power for direct-lung. At 17w the Aegis Boost Battery was just lasting me a full day.
The 0.4ohm coil is the one I knew would be best suited to me, and, spoiler alert: I was right! It has a wattage range of 25w-33w; I did start below this threshold again (on 20w) just to bed the coil in and also out of curiosity to see if it can perform outside of its recommended settings. I left the above Rhubarb & Custard E-Liquid in the pod to see how frequent direct lunging on this coil worked with slightly thinner juice. I left the airflow fully open and even on 20w the coil still performed well. I got a good draw with plenty of vapour (this shows the potential for big clouds with higher VG E-Liquid), it certainly didn’t feel like I was under-powering the coil at all! There was still decent flavour too! Again I gradually worked my way up the wattage and found the optimum for this coil (for my preference) was 30w. This gave off a thick, dense cloud (again impressive for 60vg) and the flavour was brilliant. The draw is still a little tighter than I’m used to but that’s more because I’m used to a mech mod / RTA with huge power and lots of airflow! I’m on my 6th (and a half) day of using this coil now with heavy use and there’s no signs of burnout or flavour drop off at all. I must say I heard rave reviews about this kit before trying it but still didn’t expect it to be as good as it is! I was impressed with the 0.6ohm coil but I love the 0.4ohm coil! With heavy use at 30w the Aegist Boost battery lasted me about 9 hours which was just enough to see me through the work day. It charges from flat to full in just over an hour which is good though, so you’re not waiting ages for it to charge. Plus, it has pass-through capabilities so if you get desperate you can have a draw while it’s charging. The charge port is on the side of the mod underneath a rubber bung.
-For this kit, I think its safe to say that Geekvape have once again knocked this out of the park with their Aegis Boost. It’s sleek, lightweight, durable and practical which are qualities I look for in a device.
-I thought although the airflow was slightly restricted compared to what I’m used to, it was still nice and smooth and not too loud either which can be something people are put off by.
-The flavour was great on both coils, as was vapour production.
-The top fill feature was fantastic as you don’t have to take the pod off to fill which can be a pain.
-I love how comfortable the device was in my hand, and how it still packs such a punch for a small kit.
-The kit is very versatile in that it can comfortably perform both mouth-to-lung and direct-lung.
-I like the addition of the mouthpiece cover as dust / fluff can usually easily get in your mouthpiece from your pocket.
-Perfectly simple to use which is exactly what a pod kit should be.
– I do have one minor concern which is the press release button/catch which allows the user to remove the pod for changing coils. This is seemingly just plastic, so although I’m pretty certain it won’t snap any time soon, I do get a feeling that if anything on this kit could break, it would be this. However, this is very minor compared to the rest of the pros on this device.
-The pod is quite dark so it can be slightly difficult to see liquid level.
-The battery life isn’t huge but that is to be expected from a small pod kit. It still did pretty well as far as battery life goes.
-Although I had the mouthpiece cover as a ‘pro’ above, if I’m being really picky it would be good if it was either magnetic or attached via a small chord so it can be placed somewhere else on the kit while you’re vaping. This is only because I’m prone to losing things though!
Overall, I was very pleased with my experience with this kit. It’s straight forward, easy to use and performs excellently. I would say it could easily be used as a quit smoking kit with the mouth-to-lung capabilities of the 0.6ohm coils. Or if you are an existing vaper looking for something new and like the idea of a pod kit, this should definitely be one you consider!

Thank you for reading and I hope that this review has shed some light on this kit and how it performs. I’ll pop a link for you to check out and get yourself an Aegis Boost Kit from our website as well! Click here for the Aegis Boost Kit!
Don’t forget to check out our Facebook and Instagram pages for daily updates and discount codes when you order online!
Again, thanks for reading and please keep an eye out for the next blog post.
Cal
Hello and welcome back to another blog post. This week I thought we would look at the VPR Range we have in stock and walk through the flavours and how I found them to be. So let’s dive right in!
The VPR 100ml Range can be found on our website, just click the link here or at the bottom of the review.

Berry Bomb: This flavour is a good strong mix of berries which in my opinion is delightful. One thing I didn’t expect with this flavour is the cool hit of menthol. Although I was shocked as there was nothing to indicate any inclusion of menthol/coolant, this was a great surprise for me as I love a cool blast in my e-liquids. The menthol compliments the berries perfectly, giving it that icy, chilled after taste. The only downside I would say is it doesn’t say anywhere on the bottle that there is menthol included which could be seen as a negative as some people don’t like it.
Blackcurrant Lemonade: The Blackcurrant lemonade is exactly what I thought it would be; a real ripe, earthy blackcurrant taste followed by a zesty, fizzy lemonade. A nice and simple flavour that really works well and makes for a great all day vape.
Blueberry Blitz: Quite the heavy hitter when it comes to blueberry flavours. For saying it’s just straight up blueberry it was so bold and deep flavour which I did enjoy quite a bit. Fresh, sweet and juicy are three words I would say describe this blueberry and I thoroughly enjoyed it.
Citrus Jelly Burst: Not as sour as I expected but still plenty zesty. Lots of zing from the lemons and limes with a very pleasant gummy candy taste mixed in there to take the edge off. For me it’s important that citrus flavours aren’t too overpowering, so the ‘Jelly’ aspect of this flavour is pivotal in rounding it off and providing a lovely sweetness to the lemon & lime.
Cucumber Twist: As strange as this combination sounds, I was very eager to try it I’ve never had a cucumber flavoured e-liquid; it’s refreshing to see someone try something different and ‘out there’. There’s no denying there is a strong cucumber flavour but it’s accompanied by a squeeze of lemon and lime to create a surprisingly fresh vape. This wouldn’t be my first choice but it caught me off guard with how much I enjoyed it.
Gummy Bear Blood: This is a blood orange gummy bear which I was very excited to try. It’s quite a sweet flavour as you’d probably expect from a gummy bear, and similar to the Citrus Jelly Burst I feel this is necessary to a point to ensure the blood orange isn’t too dominant. However, I do love orange flavours and think VPR could have been a bit more subtle on the gummy with this one as the orange is toned down just a tad too much for my personal preference. It would still be an ideal flavour for someone who loves their sweeties though!
Kyoho Grape: The greatest grape I’ve had in a while. I can’t say I’d heard of the Kyoho grape before this, but after looking into it, it’s a Japanese black grape known for its natural sweetness and juiciness. I can confirm that it tastes exactly as described! You get the strong flavour from the black grape which is mellowed off by just the right amount of sweetness. Sometimes when I’ve had grape flavours I have found them to give an artificial taste, but with this, the flavour is full and natural which is of course exactly what you want from a flavour.
Mango & Pineapple: Such a good combination of flavours here that are always going to work together. For me it’s a perfect balance of the two; neither flavour is too strong and they come together to make a delightful tropical e-liquid.
Melon Madness: I’m generally quite unfussy when it comes to flavours, but in all honesty I’m not a massive fan of melon so I was a bit apprehensive about trying this one. There was definitely plenty of flavour in there though. The best way to describe it would be like a layered vape; so I tasted honeydew first, then cantaloupe, then watermelon. It was quite impressive that they achieved this to be honest, but like I say it was probably wasted on me as I don’t like melon! There’s also what feels like a tiny amount of Koolada in there, but not too much where it makes the flavour really cold, it just gives it a bit of freshness which I suppose goes well with melons.
Pink Berry Peach: The Pink Berry Peach is a blend of strawberries and peaches which come together to make a subtle, well balanced flavour. This won’t blow your socks off with overwhelming flavour, but that’s a positive for some people. I found it enjoyable.
Soft Mints: If you like your mint-based liquids then this is the one to go for. I would say soft mints are usually more subtle on the mint, however I predominantly tasted peppermint with this one which reminded me more of those strong Wrigley’s mints (this wasn’t a bad thing for me at all as I love strong mints). You still get that sort of candy sweetness aftertaste as expected from soft mints which is great, but you also get an icy kick (presumably from Koolada) on top of the peppermint so it’s definitely stronger than your average soft mint. This was one of my favourites by far.
Tropical Thunder: Now this flavour is definitely on the sweet side of life. When you first open the lid it almost smells too strong, as if you’re about to vape a concentrated cordial, but when it’s in your tank this is not the case. It’s really hard to pinpoint exactly what fruits are in this one. The main one I can identify is pineapple, then the rest of the tropical fruits just seem to come together in perfect harmony to form a juicy, sweet, and outright tasty concoction! It surprised me at how much I liked it for saying I couldn’t really put my finger on any fruits. It was just so moreish and the flavour didn’t drop off at all!
As I said further up, I’m not really fussy when it comes to E-Liquid, but despite this I was still not expecting to enjoy every single flavour. I think this range uses a lot of concentrated flavour to ensure it’s nice and punchy with minimal flavour drop off, which I can imagine will appeal to a lot of people. There’s a lot of choice too which is brilliant; with some simple flavours, some complex, and some really different ones, it shouldn’t be hard to find one that tickles your fancy.
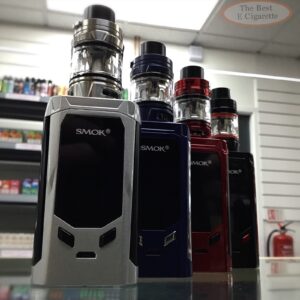
When it comes to dual 18650 kits, I often find that they can be too bulky for the hand and are uncomfortable in the pocket. However, with the innovation of SMOK, they’ve released the R-KISS Kit. In today’s review, we will be looking at the full kit which comes with the TFV-Mini V2 tank and seeing how this kit stacks up with everything else on the market.
The mod itself is a dual 18650 battery mod with a max output of 200w. It is compact which makes it a lot easier to carry around in the pocket and at 77mm tall and 44mm wide it’s pretty small compared to previous Smok mods like the Alien TC220 and the Procolour kit. As for the rest of the mod, you’ve got the classic side-bar firing button which we have seen quite a lot with SMOK products over time. The button is quite ‘clicky’ which is a major positive in my book as I like to know the button has pressed properly. There are also adjustment buttons at the bottom of the LCD screen which again are quite clicky, and there’s a micro USB port at the bottom between the adjustment buttons which is in a good position to comfortably stand the mod up while charging. Please remember though you are better off charging your batteries in a bay charger (Click Here for Bay Chargers) if your mod takes more than one battery. This is because bay chargers ensure each battery is charged evenly and at the same rate, so all batteries receive the same charge and not one is favoured over the other(s). On the subject of batteries, the battery door is located underneath the mod which is quite sturdy; I guess SMOK have learnt their lesson with these doors since the Alien Mod was prone to popping open on its own!
As for features on the R-KISS mod, it is very minimal, as much as I would like to have seen SMOK’s trademark menu system, the idea behind the kit was to keep things as easy as possible for sub-ohm vaping. This means no complex menu system to contend with, just wattage adjustment. The only real option you can change on this device is your colour scheme by pressing and holding the positive and negative buttons simultaneously, this allows you to cycle through the colours so that it’s to your personal taste.
Because this mod uses two 18650 batteries that aren’t included, this gives the user the option to choose what batteries they go for. Being a heavy user I need good battery life (high ‘mAh’ on batteries), so I opted for two of the Efest 3100mAh batteries which lasted me over a day before they needed charging.
The tank that this kit comes with is the TFV-Mini V2. Again when it comes to stock tanks, I don’t usually hold out much hope for them, considering I’m more of an RBA/RTA person myself. I tend to use the tank a couple of times and then switch back to my Geekvape Zeus RTA. However, for this review, I did use this tank quite a bit and put it through the paces. To be fair, it came out on top!
The tank itself is built well with some good machining on the base and top cap of the tank; everything opens smoothly but with just the right amount of resistance so there’s no cheap feel. The diameter of the tank is 25mm which is standard for a lot of sub tanks and it does sit nice and central on the R-KISS kit which is another point I quite like about the kit.
Filling the tank is simply done by holding down the button at the top of the tank and then twisting the top cap to open and reveal the fill hole on the side. From there you can go ahead and put in your favourite juice (I’ve been using the Soft Mints from VPR). When you have filled your tank, simply push it shut and vape away (after leaving it to soak for 5 minutes if it’s a fresh coil, of course).
Changing the coil is also simple. To do this, unscrew the base of the tank and then unscrew your coil from the base. Then just screw in a new coil and put the tank back together.
The Kit comes with two coils, one pre-installed and the other as a spare coil. Both of these are mesh coils for optimum flavour, vapour and longevity. These coils, in my opinion, are my favourite ones to use but the TFV-Mini V2 does have a wide choice of coils available for different vaping experiences. These include the S1, S2, K1 and K2 coils.
The A1 coil is rated at 0.17ohms with a range of 90w-140w whilst the A2 is a Dual 0.2ohm coil with a range of 70-120w. In my personal opinion, I tend to get the idea that SMOK might be over-rating the coils which has happened before with their coils. To remedy this, I ran my coils lower than the minimum which allowed me to choose what’s best for the coil. For example when using the A1 coil which runs between 90w – 140w I first used this at 50w which still performed adequately, then slowly increased the wattage until I found that around 85w was perfect for me in terms of flavour and vapour production. I was getting the full, strong, fresh mint but with the perfect amount of sweetness, all accompanied by deep clouds of vapour. I got around 10 days out of this coil (with quite heavy use) before it burnt out and I had to change it. I started the A2 (0.2 Ohm / 70-120w) on 40w which again performed okay; I eventually ended up on 70w (the bottom end of the recommended wattage range for this coil) and found this gave me the best flavour and vapour. I’m still using this coil now and I’m on day 8 with it – still going strong!
After using the R-KISS kit for a while, I found it to be the simple kit that just keeps on giving. It is so easy to use for a powerful sub ohm kit, and I was very pleased with the overall performance of the kit considering I’m used to a Mech / RBA or RTA setup. If I had to pick a fault with the kit it would be based on a small feature of the tank which is its drip tip. I enjoy the idea of having my own custom drip tips on top of my tank, but the tank’s drip tip is essentially just a sleeve which fits over the top of the tank instead of being an interchangeable / universal drip tip. I know this is very minute flaw when the rest of the kit has impressed me so much, but it has to be said! I would still certainly recommend this to someone who wants to transition from mouth-to-lung (MTL) to Sub-Ohm and is looking for something easy to use with no hassle.
If you are looking to get an R-KISS Kit, we’ve got them available on our online store and also in-store as well! Click here and get yours today.
Thanks again for reading.
This review was written by Cal.
Vaporesso Target PM80 Pod Kit. This is one of the latest devices in the trend of pod systems we’ve been seeing recently and here, we’re going to have an in-depth look at this kit.
The Target PM80 is a 2000mAh internal battery kit with a max output of 80W, which, to say the least definitely packs a punch!
For the purpose of this review, we purchased the device ourselves so we could give a 100% genuine and unbiased opinion. After using it we decided to stock them ourselves so that probably gives you an idea of the way this review is heading. Hint: we loved it!
The feel of the Target PM80 is as you’d hope for from a pod kit; it’s sturdy, compact, fits well into the pocket and is very comfortable and discreet in the hand because of its small size.
The mod itself comes with a shiny alloy-look finish coupled with a faux leather feel grip on the back in your desired colour/pattern. Since I’m quite boring when it comes to colours, I’ve gone for the black version of this kit, however it does still look stunning if I do say so myself.
The Target PM80 comes with a built-in 2000mAh battery and a max output of 80w, however with the lowest resistance coil available (0.2Ohm) having a maximum wattage of 60W, I don’t think you will be getting as high as 80W but at least it leaves room in case they bring out any new coils in the future. With the high wattage capabilities in mind, a big worry with Pod kits is that their batteries are not large enough to last when being used at high powers. When it comes to charging the kit I have found I haven’t had to charge it regularly at all, even when using the 0.3ohm coil heavily on 40W. I can easily get at a day’s charge from this kit before having to charge it. In the box is a Micro USB charge lead and the PM80 has a 2AMP quick charge feature that is all the rage these days (people don’t want to wait long for a fully charged battery). I have found the kit charges quite quickly so in that department, I have no complaints.
The chipset inside is the Axon Chip which fires at a rapid 0.001s. After continuous use of the PM80 I have found this to be true; the response time from pressing the fire button is extremely fast. On the note of button pressing, the buttons on this device are quite ‘clicky’ which is a major positive to me as I like to know when I’ve pressed a button!
For the Target PM80, the coils used are the GTX Range. Some of you more eagle-eyed readers might recognise these from the GTX One kit that’s been floating around recently. The coils themselves utilise a mesh style build which is extremely popular in vaping due to the improved flavour and lifespan over traditional coils.
For installing your coil, it’s simple to do, remove your pod from the device and push in the coil. Please note the line that goes through the coil, that will have to be in line with the drip tip of the pod to install it correctly.
The 0.2ohm GTX coil has a wattage range of 45w-60w. Even at 40W the flavour is great and the vapour production is impressive! No complaints about it but bear in mind it is quite powerful for a pod kit coil, maybe open a window when vaping indoors to keep visibility!
The 0.3ohm GTX coil has a range of 32-45W. I must say that this is one of my preferred coils out of the stock coils that came in the box because with the juice I’m using I prefer the slightly lower wattage (I’ll get more into the juice further down). The flavour is fantastic and still produces a good amount of cloud.
So when it comes down to a kit like this, I was expecting minimal features on the device but we have an abundance of choice when it comes to settings.
Turning the device one is five clicks and turning it off is also five clicks as you’d expect. Adjusting the wattage is achieved by the two buttons located at the bottom of the screen which will increase/decrease in increments of 0.5w.
To lock the adjustment keys for your preferred wattage, press the fire button three times in quick succession. To unlock, press the same button three times.
Accessing the menu is simple too, just press and hold the positive and negative buttons and this will access the menu. From here you have the following options:
Smart VW: This is a great feature in my eyes. When you have turned this feature on, it auto-detects the correct wattage for the coil that is installed. An example of this would be the following: if I take the pod out and install the 0.3ohm coil with has a wattage range between 32-45w, with the smart VW mode turned on, it will automatically set the wattage to 40w as I pop the pod in because this is the best setting for the coil according to the device. If you find that the set wattage from the smart VW mode is too much or too little, you can still adjust it but it will change the wattage every time you remove the pod and pop it back in. To turn this mode off, access the menu again, select Smart VW from the menu and press off.
VW Mode: This is the standard variable wattage mode that the device will be set in when you first start using the Target PM80.
VV Mode: This makes the device work In voltage and will act accordingly to the battery’s charge.
Puff: Display and reset the puff counter
Default: Reset the device to factory setting
Theme: Change the colour of the screen
Exit: Exit the menu
The Target PM80 also comes with a bunch of different safety features listed below:
USB input
Low battery
No Load
Short circuit
Overtime
Overheat
The million-dollar question on everyone’s mind, is it any good? Well I’m happy to report that the Target PM80 is a brilliant device, I’ve been using this one for around 3 weeks now primarily with the 0.3 Ohm coil, and am only just having to change the coil now as I’ve been writing this review. That’s not to say coils will last three weeks every time as you all know, different factors affect coil life in different ways, but I’ve been pretty lucky with the coils I guess!
I usually make my own juices with a minute amount of nicotine (around 1mg) for my mech mod / RBA setup, but to test the PM80 I decided to try a bit more nicotine because not as powerful as my mech. I’ve been cycling through British Blend range in 3mg, with a new flavour every time I finish a bottle. The flavour from the coils is tremendous and I haven’t noticed any drop in flavour either. The cloud production is great too, I wasn’t expecting a pod kit to perform as well as it’s done and produce a dense amount of cloud, especially considering British Blend 3mg is only 60% VG! I would quite happily say that this is a remarkable sub-ohm pod kit and if there wasn’t a ‘go-to’ before, there certainly is now!
So as you can gather from the review, I would happily recommend this kit based on the overall performance and design; the features on the device work flawlessly and if it broke or got lost, I would be more than happy to replace the kit!
The price of the kit is £44.99 from the site which for a device like this and the extras it comes with, I would say is a great price.
Although I have yet to try the 1.2ohm coil in the GTX range, I would say this would be more for someone who is looking for a compact sub-ohm kit but I’m sure with the higher resistance coil that it would work well as a mouth-to-lung (MTL) kit.
Thank you for reading and I hope this has been informative if you have enjoyed the review. If you’re reading this from our Facebook post, let us know in the comments down below what you thought! If you’re reading this on our website, head on over to our Facebook page and give your feedback there! We will be doing more reviews soon so watch this space!
Get your Vaporesso Target PM80 here.
This review was written by Cal.
Hope you are all well and keeping good in 2020 (all things considered of course). As you are probably aware, it has been a good few years since we last did a blog post and to be quite frank, we’ve missed doing these blogs so we thought we would jump right back into it and get them going again!
We will be covering a wide range of things here from e-liquid to hardware; deals to outright bargains; tips to tutorials; latest news to regulations; and everything else e-cig related!
In this particular post, I thought it would be best to write about changes that have happened during the lockdown, the first being that we have had a bit of a make-over instore which was long overdue! We’ve had new carpets, decorated the walls and had perspex put up to keep in line with COVID guidelines.
We’ve had quite a few new e-liquid ranges in-store which we will be getting into in our next post, along with lots of new hardware including the latest vaping trend, Pod systems. These particular systems couple well with Nicotine Salts which work slightly different to freebase nicotine; they are absorbed into the body faster to satisfy nicotine cravings quicker, and although they come in a higher nicotine content (20mg is the average) they are a lot smoother on the throat than freebase meaning you can use max strength without the extreme harshness.

As I said previously, this is just a quick “hello” to say we will be doing blog posts as regular as we can, so keep your eyes out for them!
We’re also posting regularly on social media to showcase our products. I’ll pop a link just below so you can check them out as well.
Facebook: https://www.facebook.com/thebestecigarettederby
Instagram: https://www.instagram.com/thebestecigarette/?hl=en
You can keep up to date with what we are doing here as we post just about every day.
Thank you for reading and we look forward to hearing your comments on our future blogs.
The Best E-Cigarette
The Innokin iTaste Kroma-A Kit consists of the Innokin Kroma-A Mod and the Innokin Axiom M21 Sub Ohm Tank.
The Kroma-A Mod is a Temperature Control, Variable Wattage 75W Mod with a 2000mAh built in Li-Po battery, a micro USB Charging port and an OLED screen to display all of your essential settings (Wattage, Voltage, Atomiser Resistance, Battery Level and Puff Timer). It operates a 3-click Lock/Unlock safety feature to prevent accidental firing. Click the firing button quickly three times to unlock the device, then when finished vaping quickly click it another three times to lock it. Like most Innokin Mods, the Kroma-A has a traffic light system to indicate the battery level. This means when you hold down the firing button it will light up Green (High), Amber (Medium) or Red (Low) to show how much battery is left. When on charge, the firing button will light up using these colours however when it turns green this does not mean it is fully charged. The light will go off when the mod is fully charged. A USB Charging cable comes with the kit to charge the device. The Temperature Control feature of this mod supports Nickel (Ni), Titanium (Ti) and Stainless Steel (SS) Coils.
The Innokin Axiom M21 Tank is a 2ml Top Filling Sub Ohm Tank with adjustable airflow, 510 threading and a wide bore delrin drip tip. If the drip tip is too wide, there is a spare thinner one that simply pops into the top of the existing one. The Axiom has a pre-installed 0.5 Ohm coil with a recommended wattage range of 20W-35W, as well as a spare 0.65 Ohm coil with a recommended wattage range of 35W-65W. To change the coil, simply unscrew the base and screw off the coil. The kit comes with some spare O-Rings (seals), a spare glass tube and a vape brand to protect the glass.
-Wattage Range: 6W-75W
-Battery Capacity: 2000mAh Built-in Li-Po Battery
-Screen: OLED Screen to display Wattage, Voltage, Atomiser Resistance, Battery Level and Puff Timer.
-Charging: Micro USB Charging Port. Traffic light battery level indicator.
-Chip: Aethon Chip
-Temperature Control: Nickel (Ni), Titanium (Ti) and Stainless Steel (SS) coils.
-Capacity: 2ml
-Filling: Top Filling
-Coil Change: Bottom coil change
-Airflow: 3-slot adjustable airflow
-Atomiser: Pre-installed 0.5 Ohm Atomiser (20W-35W) with 0.65 Ohm atomiser (35W-65W) spare.
-Drip Tip: Wide bore delrin
-Tank Material: Glass tube
-Threading: 510
-Innokin Kroma-A Mod
-Innokin Axiom M21 Tank (Pre-installed 0.5 Ohm Coil)
-Spare 0.65 Ohm Coil
-Spare Glass Tube
-USB Charging Cable
-Vape Band (to protect glass)
-Pack of Spare Seals
-User Manual & Specifications card
Kit Price: £59.99

Welcome back to our blog page! Yes, it has been a minute but with the curren...
Read More
This week we will be looking at the Argus Pro Kit from Voopoo. We know Voopoo f...
Read More
Good day, and welcome back to another blog post. This week we will be looking a...
Read More